
WooCommerce Advanced Product Labels Plugin is an advanced plugin that allows you to create custom labels for your products. The plugin supports a wide range of fields, allowing you to create labels that are customizable from the product attributes, price, to ASIN, SKU, product size, color, weight, quantity, variant, and more. You can choose to show a combination of these fields in a label, or not show at all.
WooCommerce Advanced Product Labels Plugin is a tool that helps you create beautiful and professional looking product labels for your WooCommerce products.
In this blog post, we will do a software review of the WooCommerce Advanced Product Labels plugin which is the 2nd most popular WooCommerce plugin. We will talk about how to install WooCommerce Advanced Product Labels plugin, examples and features, basic usage, performance, how it compares to the Advanced Product Label plugin, and much more.
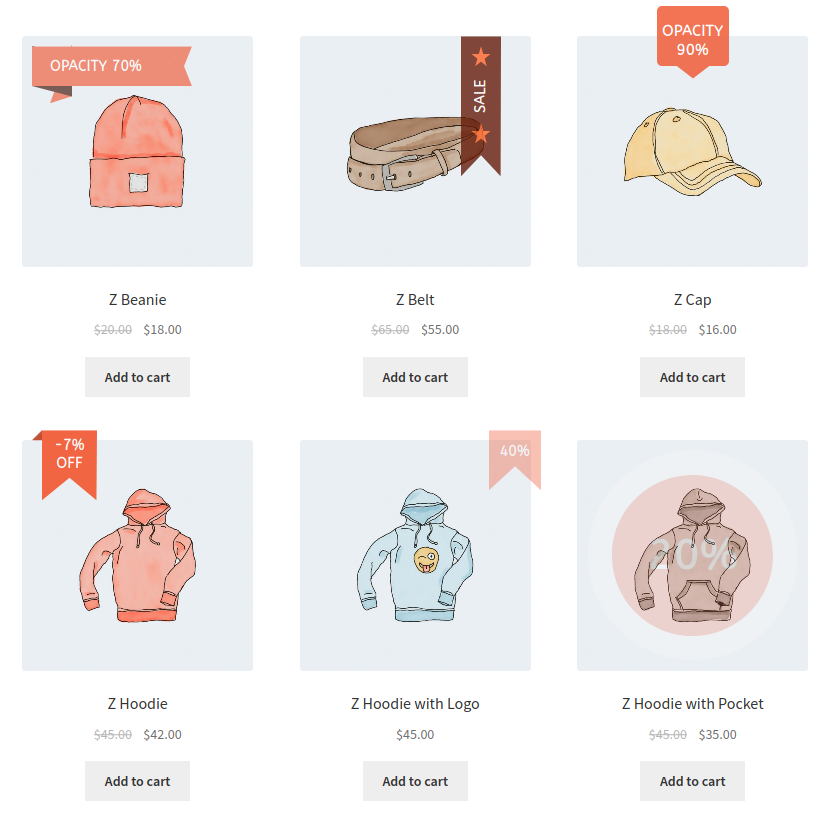
Do you have a WooCommerce store and want to stand out from other online sellers? Try adding product labels.
Product labels are a great way to display important product information, present special offers and highlight current sales in your store.
And if you decorate them with bold colors and interesting graphics, they will be very appealing to anyone who visits your store.
Today we’re going to look at the features of a plugin that makes it easy to add and manage product labels.
His name? Improvement of product labels.
WooCommerce Advanced Product Labels is a powerful WordPress plugin from BeRocket that offers a range of attractive templates, label content options, advanced styling and more. It is designed to help you increase your conversions by making products dynamic, attractive and visible.
It’s hard to describe the effect of the shortcode with simple text, so you can see the plugin in action here and here to understand what I mean. These are striking examples of what you can create with Advanced Product Labels. The plugin has nearly 30,000 installations and has been on the market for 4 years.
In our hands-on test of WooCommerce Advanced Product Labels, I’ll explain in detail how this plugin works and how you can use it to add labels to your products.
WooCommerce Extended Product Labels Overview: List of functions

In short, BeRocket Advanced Product Labels is a product customization and enhancement tool designed specifically for WooCommerce and WordPress.
It will help you create product labels that stand out on your website, with features like:
Continued from the article below
- 50+ ready-to-use templates, including customizable CSS templates, discount timer templates and image templates
- Different types of content and product reports
- Label style options, e.g. B. Font color and margins for custom labels
- Changing the opacity, gradient and shadow effect
The tool also allows you to choose the type of label you want to add to your products. For example, you can B. Choose In Header to place the label to the right or left of the product header.
Since BeRocket Advanced Product Label is a WooCommerce specific tool, it integrates seamlessly with the main WooCommerce installation. Install it on your WordPress WooCommerce site, give it access to WooCommerce features through the WordPress API, and you’re done.
Practical work with BeRocket extended product labels
Now let’s dive in and I’ll show you how the different features of WooCommerce Advanced Product Labels work.
1. Creating a new label
To get started, open your WordPress dashboard and click on BeRocket → Advanced Tags.
The next step is to add a label. To do this, click the Add Shortcut button next to the More Shortcuts label at the top of the screen.
BeRocket will now redirect you to an area where you will find the tools to create a new custom label from scratch.
First, enter a name for your label. You can write sales or bestsellers depending on how you want to promote your products.
You can then choose one of the 17 available conditions for your product label. At this point you can decide if you want to mix conditions with the AND or OR operators.
When creating the sale tag for my product, I selected the On sale option as the first condition and the Page ID as the second condition. I then used the AND operator to create a relationship between them.
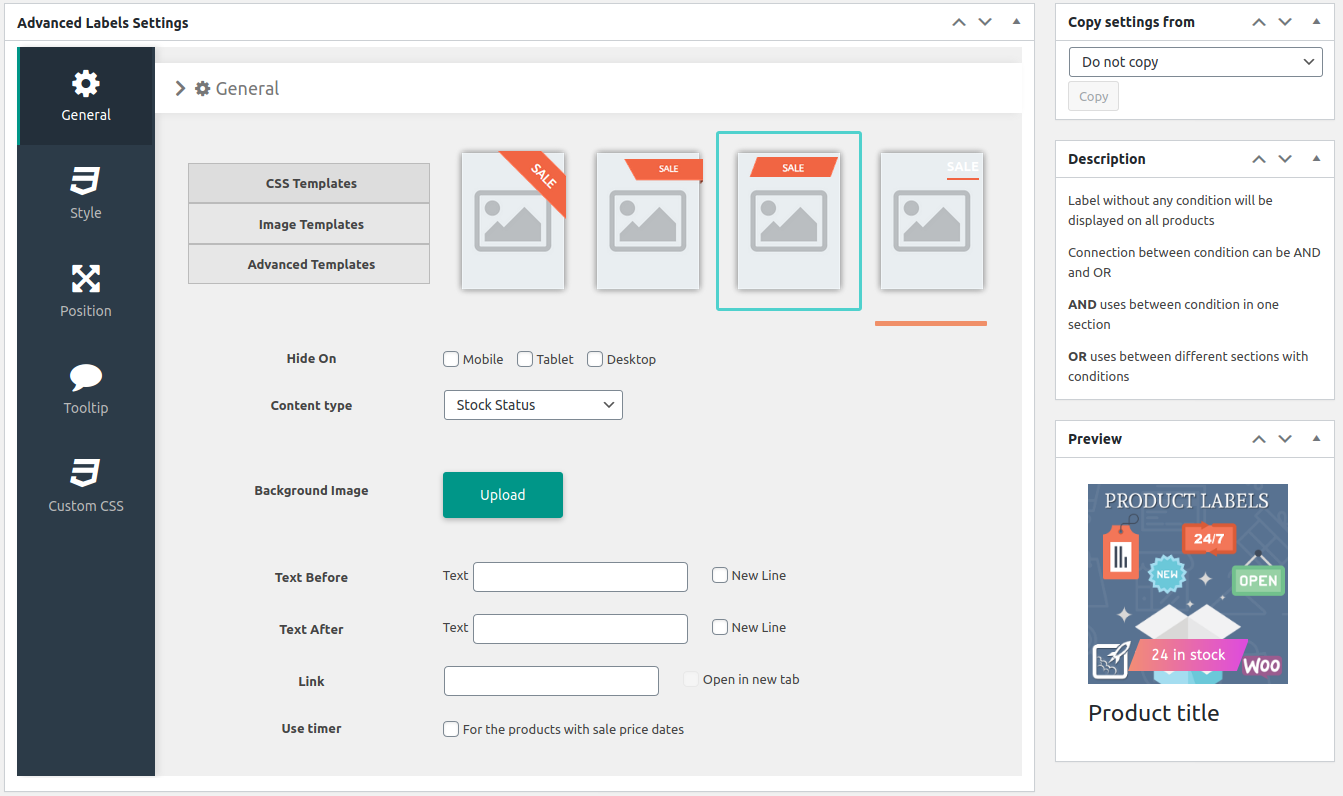
Then go to Advanced Label Settings and select the template you want to use for your label. If you do, BeRocket provides options to hide the shortcut on mobile devices, tablets and/or desktops. Check the box of the device on which you do not want the label to appear.
You can also choose from 8 types of content for the label:
Continued from the article below
Depending on the option selected, the plugin changes the text, background image and image title of the tag. Then click on Save to create a new label.
2. Change label style
Not happy with the current style of your label? No problem, you can customize it in the Style tab of the advanced shortcut settings. I’ll show you how it’s done.
First I create a new tag, this time to display the stock status. Then I go to the Style tab and choose a new background color.
There are many options to play with. You can change the font size, width, height, border radius, border width and much more for your label.
Two options I particularly liked were the opacity and the shadow effect. Used correctly, both effects can draw attention to your best offers.
3. Change marker position

Another useful option on the Advanced Product Labels tab is provisioning. This option allows you to choose whether to leave the label in its current location, place it on the image, or place it in the product header.
Depending on the type of position you choose, you can set the marker in BeRocket for left, right and center positions.
You can also customize the label’s indentations and margins and run it in an A/B test to see if single-spaced labels improve conversion.
4. Using the tooltip
With BeRocket Advanced Product Labels, you can also create tooltips. A tooltip, also known as a tooltip or toolbox, is a graphical user interface element that displays a text box with information about an item when the user hovers over it.
You can create a tooltip for each tag to inform visitors about its function or explain the meaning of a particular acronym. BeRocket allows you to select the content you want to display and upload a custom tooltip image.
The plugin also lets you decide if the tooltip should appear or close after a delay, if it should have a dark, light or translucent style, and much more.
In addition, you can set a tooltip for the top, bottom, left and right positions. Place it where you think visitors are most likely to pay attention.
How to use timers in WooCommerce advanced product labels

Timers help visitors create a sense of urgency. You probably know that feeling when the countdown is 10…9…8…7…. and you suddenly want to act before the countdown reaches zero.
Advanced Product Labels allow you to set time limits for all products with selling price data.
To do this, open BeRocket → Product Labels in the WordPress admin section. Then select the addon called Timer and click Save Changes.
Then open Advanced Labels and click on Add New Label. Enter the same name you used when creating the product label, i.e. Sale, and select On Sale as the condition. Now activate the Use Timer check box. Next, you will see on the screen different timeframes that you can select for the sale.
With the Addon Timer, you can choose between large and compact timers. You can also add opacity or shadow effects to the timer, change the fields, and order the Advanced Product Labels plugin to display leading zeros.
You can also change the style of the timer with the same settings as the label, but any style change will also be reflected in the label, since the two elements are linked in WooCommerce Advanced Products Labels.
How to use gradient alignments in extended product labels

Gradients are a great way to stand out in a design. Good color gradients also help to encourage people to make impulse purchases by eliciting an emotional response to color.
In the advanced version of the product label, you can mix different shades of bright colors and create unique combinations inspired by nature, with a gradient at the end and standard colors.
In addition, the plugin allows you to choose the alignment of the gradient, for example. B. radial, elliptical and linear, which makes it interesting for visitors.
To access gradient alignments, run BeRocket → Product Labels in the WordPress admin area. Then select the addon called Gradient and click Save Changes.
Now go to Advanced Tags and click on Add a new tag. Then in the Style area, click the Use gradient checkbox to see all available options.
You should now be able to choose the starting color of the gradient, the ending color, the angle and the alignment.
And that’s it.
As you can see, BeRocket’s WooCommerce Advanced Product Labels is a pretty powerful tool when it comes to creating labels for your products. Although making labels requires some knowledge, after you have made a few labels for your products, you will find that it is not difficult.
WooCommerce Advanced Product Tagging Pricing
WooCommerce Advanced Product Labels only comes in a premium version, and the cost depends on the number of sites you want to use it on.
There are four different price tiers, each with lifetime support and upgrades. The only difference between them is the number of WooCommerce pages you can use the plugin on:
- 1 location – $34 one-time fee
- 3 sites – $39, one-time fee
- 5 pages – $59, one time payment
- 10 sites – $89, one-time fee
BeRocket currently offers 3, 5 and 10 site license options at discounted prices (regular prices differ from those listed above).
If that doesn’t convince you to try WooCommerce Advanced Product Labels, then the 30-day money back guarantee should convince you.
If you want to test the plugin before investing, BeRocket offers you a 30-day window to try the features. Those not satisfied with the experience can ask for their money back before the window closes.
Latest thoughts on WooCommerce advanced product labels
I tried WooCommerce Advanced Product Labels on a friend’s WooCommerce store and tested the functionality. In fact, it has proven to be a robust plugin with excellent functionality for creating product labels.
Although it takes some getting used to, it works perfectly and even gives a live label preview. The example is especially useful for seeing how your changes affect the appearance of the label.
If you’re not happy with a particular style change in the preview, you can change it immediately rather than waiting to come back to it after the link is published.
In general : If you are interested in creating product labels, you should try WooCommerce Advanced Product Labels. There is a 30 day money back guarantee, so you are not taking any chances.
Try WooCommerce Advanced Product LabelsWooCommerce is one of the most popular e-commerce plugins, having been downloaded more than 11 million times. It is also one of the most popular CRM plugins, WooCommerce Advanced Product Labels Plugin is one of the most widely used WooCommerce plugins, making it a great choice to review.. Read more about woocommerce sticker designer and let us know what you think.


